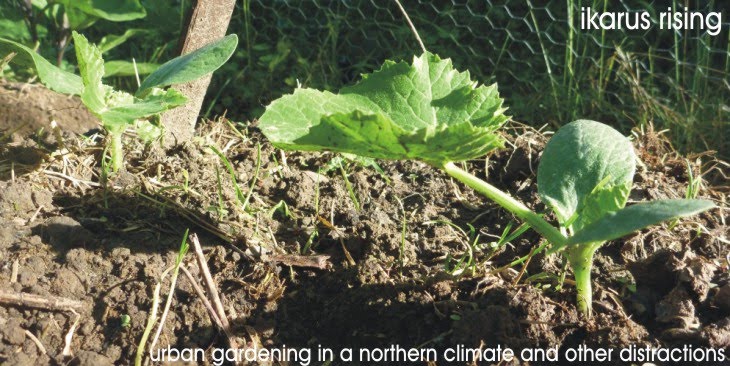
I returned from my trip to find almost a completely different garden from the one I left thanks to the watchful care of my guest gardener. Seven zucchini had germinated and already sprouted their primary leaves.
As instructed, a few days ago I thinned them to two seedlings on each mound. All six of the plants were very healthy, so I´ve given the two I removed to a friend (and guest gardener/photographer).
Several green beans had also germinated, although they´re struggling somewhat to put out their primary leaves.
I think that they´re being eaten nightly by slugs. I´ve had this problem with green beans before.
The Snowy White eggplant also sprouted (thorny!) buds in my absence:
The buds are quite large now, but haven´t yet begun to open.
Both varieties of sugar pea are doing really well. The sugar snap pea plants are now approaching 5´ tall, and the sugar pod snow pea bloomed and grew pods in the week I was gone.
I can´t believe how fast the pea pods grow. I´ve harvested them three times in the past two days already.
Sugar pod snow pea:
The garden space itself is now almost complete.
I put in the last row of eggplant this past weekend. These eight black eggplant are a little behind all the rest, but they seem to be doing well in the ground.
I´m planning on sequentially planting green beans this year, so I´ll probably dig up and plant the next row of beans this weekend. The beans should be the final planting of this year´s summer garden.
I just ordered some more seeds from Seeds of Change. I´m planning on trying out a few new types of bush bean to see if I can find something that the slugs don´t like quite as much. Arriving soon should be Bountiful Stringless Snap Bush Bean and Robert's Royalty Bush Bean (which is on backorder, unfortunately). I also ordered more fino verde basil and some holy basil for a friend. For the fall garden, I ordered a new type of radish (French Breakfast) and spinach (Renegade F-1) to try, in addition to some Taisai Chinese cabbage, which is supposed to be like bok choy. I always like trying to grow something new. I´m hoping to extend the growing season of my leafy greens well into autumn, and possibly even have a winter harvest.
Showing posts with label slideshow. Show all posts
25.5.10
summer garden officially started
Saturday was beautiful here. It was the first nice day I had free to work on tilling up the backyard and do some serious planting. I expanded my existing 4' x 19' garden space to include three more 19' rows (two eggplant and one green bean):
and a tomato grove:
In addition to the row of Garden green beans seeds, I also planted Black Beauty zucchini seeds in two 3' mounds:
As per the directions, I planted four seeds on each mound and will thin to the strongest two once they've germinated, which should be in 5-10 days. The green beans are supposed to germinate in 6-8 days. I'm leaving town for almost a week, and I'm excited to see what will have germinated by the time I get back!
It feels great to have so many of the plants I've been growing in the greenhouses outside and in the ground. Right now I have 23 eggplant (not counting doubles) in the ground, and eight more black eggplant that I'm still hardening. In tomatoes, I have eight second generation tomato plants (all indeterminates) and nine third generation (all determinate but one):
These plants, combined with the 50+ first generation tomato plants currently producing and ripening fruit should make for a very continuous and bountiful tomato harvest this summer.
When I get back in town, I'll dig up another row and plant the last eight eggplant. I'm planning on sequentially planting my green beans this year to extend the harvest, so in two weeks I'll start another row of green bean seeds. Two weeks and two more rows and my summer garden will be officially planted.
and a tomato grove:
In addition to the row of Garden green beans seeds, I also planted Black Beauty zucchini seeds in two 3' mounds:
As per the directions, I planted four seeds on each mound and will thin to the strongest two once they've germinated, which should be in 5-10 days. The green beans are supposed to germinate in 6-8 days. I'm leaving town for almost a week, and I'm excited to see what will have germinated by the time I get back!
It feels great to have so many of the plants I've been growing in the greenhouses outside and in the ground. Right now I have 23 eggplant (not counting doubles) in the ground, and eight more black eggplant that I'm still hardening. In tomatoes, I have eight second generation tomato plants (all indeterminates) and nine third generation (all determinate but one):
These plants, combined with the 50+ first generation tomato plants currently producing and ripening fruit should make for a very continuous and bountiful tomato harvest this summer.
When I get back in town, I'll dig up another row and plant the last eight eggplant. I'm planning on sequentially planting my green beans this year to extend the harvest, so in two weeks I'll start another row of green bean seeds. Two weeks and two more rows and my summer garden will be officially planted.
21.5.10
Snowy White eggplant in the ground with thorns!
This morning I put a row of snowy white eggplant into the ground out in the garden.
They are by far the largest and leafiest of the three eggplant varieties I´m growing. I´d spent the past few days hardening them to the direct sun, wind and chillier nights outdoors, and they seemed to be adapting fine. I was somewhat startled when I took them out of the greenhouse to notice that they have pretty well-developed thorns both on the stems:
and down the veins of the leaves:
I've since noticed that all three of the eggplant varieties I'm growing have these thorns. I had no idea that eggplant could be so aggressive.
They are by far the largest and leafiest of the three eggplant varieties I´m growing. I´d spent the past few days hardening them to the direct sun, wind and chillier nights outdoors, and they seemed to be adapting fine. I was somewhat startled when I took them out of the greenhouse to notice that they have pretty well-developed thorns both on the stems:
and down the veins of the leaves:
I've since noticed that all three of the eggplant varieties I'm growing have these thorns. I had no idea that eggplant could be so aggressive.
18.5.10
pimientos de padrón harvest!
Monday night I harvested the three pimientos de padrón that were ~2" long.
Then I prepared them in olive oil with sea salt, as per the Spanish tapas style:
They were so delicious! The texture was fantastically soft and supple, unlike the pepper varieties available locally. They were even pretty spicy considering they were still green and only 2" long. They tasted just like they were in Spain. After all the peppers that we've tried to imitate them, it was so nice to taste pimientos de Padrón again. There´s really no substitute. I can´t wait for the next harvest, hopefully we´ll have enough ripe at once for a full platter!
Then I prepared them in olive oil with sea salt, as per the Spanish tapas style:
They were so delicious! The texture was fantastically soft and supple, unlike the pepper varieties available locally. They were even pretty spicy considering they were still green and only 2" long. They tasted just like they were in Spain. After all the peppers that we've tried to imitate them, it was so nice to taste pimientos de Padrón again. There´s really no substitute. I can´t wait for the next harvest, hopefully we´ll have enough ripe at once for a full platter!
10.5.10
tomatoes ripening at last and pimiento de padrón harvest pending!
The upstairs tomatoes have finally started to ripen! The Chadwick and Fox cherry tomatoes seem the farthest along, although an Oregon Spring Bush tomato has started to turn now, too. I´m really excited that soon I will have a constant supply of fresh, ripe, homegrown tomatoes!
In downstairs greenhouse news, the pimientos de padrón have gotten enormous!
I´ve really been impressed with how quickly they´ve grown. These three are now right around 2" long. The Renee´s Garden website (where I got the seeds) says that pimientos de padrón should be harvested when they are no more than 2" long; "At this small size, they are fragrant and flavorful; larger fruits get very spicy." While I´m definitely a fan of spicy peppers, I think for this first harvest, I´ll follow the recommendation. It´d be nice to wait until I had enough for a full tapa, but I think I´ll go ahead and pick these three this week.
Both greenhouses have now required multiple light fixture raisings to accomodate the growing tomato plants. The upstairs greenhouse still houses primarily indeterminate tomatoes which are supposed to grow to be quite large. The Maglia Rosa cherry, already measuring over 6´, are currently the tallest. While their size is impressive, I hope they slow down soon.
One nice thing about this more recent light raising is that it required the removal of the greenhouse plastic sheeting. As a result, the tomatoes are getting direct sunlight several hours a day through the east/west windows. The plants look really pretty in the morning and evening sun, and I´m sure that the lower leaves are appreciative of the light.
I waited too long to raise the light fixture on the downstairs greenhouse, mainly because I really didn´t think that these determinate tomatoes were going to keep growing like this. They grew up into the light until they decapitated themselves with the (minimal) heat.
The light is in a really temporary and nonideal position right now. It´s not really even providing direct light to half of the greenhouse, but at least it is again several inches above the plant tops.
Hopefully, I didn´t affect their overall plant health too much. I´m planning on moving them all outside in a few weeks anyway. We´re technically past our annual average last frost date, but especially given the recent cold spell and the frost warning we´re under for the next few days, I´ve decided to wait until June to move everything outdoors and do my first planting for the summer garden. If I follow my current plan, it´ll be more than twice as big as last year!
In downstairs greenhouse news, the pimientos de padrón have gotten enormous!
I´ve really been impressed with how quickly they´ve grown. These three are now right around 2" long. The Renee´s Garden website (where I got the seeds) says that pimientos de padrón should be harvested when they are no more than 2" long; "At this small size, they are fragrant and flavorful; larger fruits get very spicy." While I´m definitely a fan of spicy peppers, I think for this first harvest, I´ll follow the recommendation. It´d be nice to wait until I had enough for a full tapa, but I think I´ll go ahead and pick these three this week.
Both greenhouses have now required multiple light fixture raisings to accomodate the growing tomato plants. The upstairs greenhouse still houses primarily indeterminate tomatoes which are supposed to grow to be quite large. The Maglia Rosa cherry, already measuring over 6´, are currently the tallest. While their size is impressive, I hope they slow down soon.
One nice thing about this more recent light raising is that it required the removal of the greenhouse plastic sheeting. As a result, the tomatoes are getting direct sunlight several hours a day through the east/west windows. The plants look really pretty in the morning and evening sun, and I´m sure that the lower leaves are appreciative of the light.
I waited too long to raise the light fixture on the downstairs greenhouse, mainly because I really didn´t think that these determinate tomatoes were going to keep growing like this. They grew up into the light until they decapitated themselves with the (minimal) heat.
The light is in a really temporary and nonideal position right now. It´s not really even providing direct light to half of the greenhouse, but at least it is again several inches above the plant tops.
Hopefully, I didn´t affect their overall plant health too much. I´m planning on moving them all outside in a few weeks anyway. We´re technically past our annual average last frost date, but especially given the recent cold spell and the frost warning we´re under for the next few days, I´ve decided to wait until June to move everything outdoors and do my first planting for the summer garden. If I follow my current plan, it´ll be more than twice as big as last year!
Labels:
garden,
greenhouse,
pimientos de padron,
slideshow,
tomatoes
28.4.10
sugar snap pea and champion radish progress y pimientos de padrón!
Two weeks ago, I planted Sugar Snap Pea seeds from Seeds of Change. They´ve since germinated and are doing well, in spite of the cold spell we´ve been having.
Sugar Snap Pea slideshow:
You can definitely tell that they´re related to the Snow Peas.
My champion radishes are almost ready for harvest. I thinned the row to 1" plant spacing two weeks ago.
Their leaves have really gotten big. I'd probably have started picking them already, but with the colder and cloudier weather we've had lately, I decided to give them a few extra days.
Champion radish:
Indoors, the pimientos de padrón flowers have been successfully pollinated!
Pimiento de padrón slideshow:
Just as with the tomatoes, the flowers first shriveled up, some falling off completely, before the peppers appeared. Of the six mature pimiento de padrón plants I have, two have flowers and peppers, and the rest have buds of varying size. I think that the combined peppers of two plants should be more than sufficient for a pimiento de padrón tapa, so this harvest spacing should work out nicely.
I´m really surprised how many buds each plant puts out ( > 10 ). So far, they definitely seem more prolific than the average tomato plant, although I don´t know yet how many distinct harvests to expect over their lifetime.
Sugar Snap Pea slideshow:
You can definitely tell that they´re related to the Snow Peas.
My champion radishes are almost ready for harvest. I thinned the row to 1" plant spacing two weeks ago.
Their leaves have really gotten big. I'd probably have started picking them already, but with the colder and cloudier weather we've had lately, I decided to give them a few extra days.
Champion radish:
Indoors, the pimientos de padrón flowers have been successfully pollinated!
Pimiento de padrón slideshow:
Just as with the tomatoes, the flowers first shriveled up, some falling off completely, before the peppers appeared. Of the six mature pimiento de padrón plants I have, two have flowers and peppers, and the rest have buds of varying size. I think that the combined peppers of two plants should be more than sufficient for a pimiento de padrón tapa, so this harvest spacing should work out nicely.
I´m really surprised how many buds each plant puts out ( > 10 ). So far, they definitely seem more prolific than the average tomato plant, although I don´t know yet how many distinct harvests to expect over their lifetime.
Labels:
pimiento de padron,
radishes,
slideshow,
sugar snap pea
19.4.10
Indoor/outdoor update
So the Sugar Pod Snow Peas that I planted outside have long since germinated. They are three weeks old today. Here´s a slideshow of their progress so far:
They have an elaborate leaf structure that I really like.
The Bloomsdale spinach is finally starting to do something. I planted a row and a half of it, and I don´t know if the full row failed to germinate or was just eaten by slugs, but the half row is all I have now. They´ve just put out their primary leaves:
Indoors, the Maglia Rosa cherry tomatoes are finally bearing fruit. The tomatoes are oblong, making them resemble Romas.
It´ll be interesting to see if their taste differs substantially, as well.
More exciting greenhouse news: the pimientos de padrón have budded and bloomed!
I´ve been pollinating them just like the tomatoes. I can´t wait for the peppers! If they follow the same timeline as the tomatoes, then it´ll probably be another month at least before the fruit appears and starts to ripen, but at least I can pick them while they´re still green.
They have an elaborate leaf structure that I really like.
The Bloomsdale spinach is finally starting to do something. I planted a row and a half of it, and I don´t know if the full row failed to germinate or was just eaten by slugs, but the half row is all I have now. They´ve just put out their primary leaves:
Indoors, the Maglia Rosa cherry tomatoes are finally bearing fruit. The tomatoes are oblong, making them resemble Romas.
It´ll be interesting to see if their taste differs substantially, as well.
More exciting greenhouse news: the pimientos de padrón have budded and bloomed!
I´ve been pollinating them just like the tomatoes. I can´t wait for the peppers! If they follow the same timeline as the tomatoes, then it´ll probably be another month at least before the fruit appears and starts to ripen, but at least I can pick them while they´re still green.
Labels:
pimiento de padron,
slideshow,
snow peas,
spinach,
tomatoes
4.4.10
radishes germinated, eggplant transplanted, tomatoes and herbs in the sun
The Champion radishes first poked up above ground on Friday, right in their three-to-six day window.
I really like their little heart-shaped leaves. Now they have 21-24 days until they can be harvested, and I´m supposed to plant a new crop of them every two weeks to have a constant supply.
Last Thursday was an absolutely gorgeous spring day, and so I decided to transplant the rest of the eggplant outside. They will probably stay in these containers until they are planted in the garden.
My current totals are: 16 black, 17 snowy white, and 10 italian white. Suffice to say, I think we´re going to have a ton of eggplant this year.
Since we´ve had a few warm sunny days in a row now, I´ve started bringing some of the staked tomato plants and herbs outside during the day.
Tomato plants along a south-facing wall:
Bucket of herbs:
These plants have been in the sun room living off whatever direct sun that comes through the south-facing windows. I think this is probably sufficient on sunny days, but when it´s consistently cloudy, they really start to droop. They´ve taken to the outside conditions pretty well for the most part. Only one tomato plant has shown any signs of photo-bleaching:
So this Fox cherry is going to stay inside for today and recover.
I also planted a Crimson Sprinter tomato plant in the ground outside.
This plant has been nothing but unlucky. During the second tomato transplant, I accidentally placed it too close to a space heater and it wilted. I didn´t want to give up on it, but it quickly fell behind in growth compared to the other tomato plants, and then it wasn´t getting as much light in the greenhouse since it was so much shorter. So it´s been living outside the greenhouse in the sunroom. I went ahead and planted it in the ground even though it´s still really early because it´s short enough that I can easily cover it on cool nights. True to form, this plant had been in the ground all of five minutes, when the wind blew really hard and snapped off the tallest stem. I´m still not giving up on it, though. I want to see if I can get it to produce a tomato after all it´s been through.
I really like their little heart-shaped leaves. Now they have 21-24 days until they can be harvested, and I´m supposed to plant a new crop of them every two weeks to have a constant supply.
Last Thursday was an absolutely gorgeous spring day, and so I decided to transplant the rest of the eggplant outside. They will probably stay in these containers until they are planted in the garden.
My current totals are: 16 black, 17 snowy white, and 10 italian white. Suffice to say, I think we´re going to have a ton of eggplant this year.
Since we´ve had a few warm sunny days in a row now, I´ve started bringing some of the staked tomato plants and herbs outside during the day.
Tomato plants along a south-facing wall:
Bucket of herbs:
These plants have been in the sun room living off whatever direct sun that comes through the south-facing windows. I think this is probably sufficient on sunny days, but when it´s consistently cloudy, they really start to droop. They´ve taken to the outside conditions pretty well for the most part. Only one tomato plant has shown any signs of photo-bleaching:
So this Fox cherry is going to stay inside for today and recover.
I also planted a Crimson Sprinter tomato plant in the ground outside.
This plant has been nothing but unlucky. During the second tomato transplant, I accidentally placed it too close to a space heater and it wilted. I didn´t want to give up on it, but it quickly fell behind in growth compared to the other tomato plants, and then it wasn´t getting as much light in the greenhouse since it was so much shorter. So it´s been living outside the greenhouse in the sunroom. I went ahead and planted it in the ground even though it´s still really early because it´s short enough that I can easily cover it on cool nights. True to form, this plant had been in the ground all of five minutes, when the wind blew really hard and snapped off the tallest stem. I´m still not giving up on it, though. I want to see if I can get it to produce a tomato after all it´s been through.
Labels:
eggplant,
herbs,
photobleaching,
radishes,
slideshow,
tomatoes,
transplant
30.3.10
tomatoes!
I guess I must´ve been pollinating correctly. About two weeks after the first tomato flowers opened, the flowers began to shrivel a bit, close, and then fall off.
At first I was worried that perhaps I had been pollinating too forcefully, or overwatering (which is a constant concern), but then I looked inside where the petals had been and saw a tiny green sphere!
Fox cherry tomato was the first to bud and bloom, so it was also first to be pollinated and produce adorable tiny tomatoes. Since this first tomato, the plants have really taken off. Here´s a slideshow of the main greenhouse which primarily houses the taller, indeterminate tomato plants:
Even the determinate tomatoes in the smaller greenhouse have begun to bloom and be pollinated. They were a little behind the cherry tomatoes, but are quickly catching up both in terms of open and pollinated flowers.
They´re really growing so quickly. The biggest is already larger than a quarter. I can´t wait until they start to ripen!
At first I was worried that perhaps I had been pollinating too forcefully, or overwatering (which is a constant concern), but then I looked inside where the petals had been and saw a tiny green sphere!
Fox cherry tomato was the first to bud and bloom, so it was also first to be pollinated and produce adorable tiny tomatoes. Since this first tomato, the plants have really taken off. Here´s a slideshow of the main greenhouse which primarily houses the taller, indeterminate tomato plants:
Even the determinate tomatoes in the smaller greenhouse have begun to bloom and be pollinated. They were a little behind the cherry tomatoes, but are quickly catching up both in terms of open and pollinated flowers.
They´re really growing so quickly. The biggest is already larger than a quarter. I can´t wait until they start to ripen!
25.3.10
eggplant germinated
Last year, my eggplant crop really seemed to just be getting started when the season was ending, so this year I wanted to make sure that I had some mature plants ready to go in the garden once the weather got sufficiently warm. I tried to look for varieties that do well with cooler temperatures and shorter growing seasons, and decided on Italian White, Snowy White, and Black eggplant seeds, all from Seeds of Change.
My seedling heat mat was still out on loan when I first planted the seeds, and so I was trying my hot watering routine. I successfully germinated three Italian White seeds this way before I decided to reseed and try again once my heat mat returned from guest germination. The seeds really took off with the additional heat source. Here´s a slideshow of their progress so far.
You can definitely tell that some of the eggplants germinated before the others, and it seems I really didn´t need to reseed at all. I was afraid with all the water and lack of germination that the first batch of eggplant seeds had rotted. Apparently that was not the case, and it seems as though I´m either going to have to get ruthless upon transplanting these seedlings or separate them all out into their own containers and have 50 eggplants. I think I know which it will be.
My seedling heat mat was still out on loan when I first planted the seeds, and so I was trying my hot watering routine. I successfully germinated three Italian White seeds this way before I decided to reseed and try again once my heat mat returned from guest germination. The seeds really took off with the additional heat source. Here´s a slideshow of their progress so far.
You can definitely tell that some of the eggplants germinated before the others, and it seems I really didn´t need to reseed at all. I was afraid with all the water and lack of germination that the first batch of eggplant seeds had rotted. Apparently that was not the case, and it seems as though I´m either going to have to get ruthless upon transplanting these seedlings or separate them all out into their own containers and have 50 eggplants. I think I know which it will be.
23.3.10
buds open, pollination ensues
The tomato buds have opened and I now have many many beautiful yellow flowers in my greenhouses.
Thankfully, most tomato plants have complete flowers and can self-pollinate with a little encouragement. A few taps with a stick a couple of times a day is supposedly sufficient for self-pollinating plants.
Pollinating:
The Greenhouse Gardener's Companion says that the morning is, for some reason, the best time to pollinate, but I've found that the flowers aren't always fully open yet early in the morning, and have had better luck with afternoon and evening pollination.
It's so exciting to tap on the bright yellow flowers and see the pollen drift out! I don't know how long it takes for the flowers to be pollinated and the fruit to emerge, or if I'm even doing it right. I guess I'll find out if the flowers close up and fall off without producing tomatoes. As more and more flowers open, I'm becoming increasingly appreciative of the constant work of the bees in my summer garden.
Thankfully, most tomato plants have complete flowers and can self-pollinate with a little encouragement. A few taps with a stick a couple of times a day is supposedly sufficient for self-pollinating plants.
Pollinating:
The Greenhouse Gardener's Companion says that the morning is, for some reason, the best time to pollinate, but I've found that the flowers aren't always fully open yet early in the morning, and have had better luck with afternoon and evening pollination.
It's so exciting to tap on the bright yellow flowers and see the pollen drift out! I don't know how long it takes for the flowers to be pollinated and the fruit to emerge, or if I'm even doing it right. I guess I'll find out if the flowers close up and fall off without producing tomatoes. As more and more flowers open, I'm becoming increasingly appreciative of the constant work of the bees in my summer garden.
11.3.10
bouquet dill sprouted and more habanero pepper seedlings
About a month ago, I purchased and planted Ferry-Morse Bouquet dill seeds after I had planted the last of the Dukat dill seed packet from Seeds of Change. I thought that it'd be interesting to compare the two varieties both as plants, and as a culinary herb.
Here's a slideshow of their sprouting progress so far:
Also, four more habanero seeds have germinated!
That brings the habanero seedling count to six so far, and I still have three slots that have not germinated anything.
I was so impressed and pleased with the germination success of the habanero seeds, that I decided to press my luck and try to germinate seeds from a Thai green chile pepper that dried out in the refrigerator in the same bag as the habaneros. I harvested around 18 seeds from one pepper and planted two per slot in a germinating tray. I was out of germinating soil, so I just used potting soil, which is denser. Hopefully, at least a few of them will germinate and I can have a real spicy pepper assortment.
Here's a slideshow of their sprouting progress so far:
Also, four more habanero seeds have germinated!
That brings the habanero seedling count to six so far, and I still have three slots that have not germinated anything.
I was so impressed and pleased with the germination success of the habanero seeds, that I decided to press my luck and try to germinate seeds from a Thai green chile pepper that dried out in the refrigerator in the same bag as the habaneros. I harvested around 18 seeds from one pepper and planted two per slot in a germinating tray. I was out of germinating soil, so I just used potting soil, which is denser. Hopefully, at least a few of them will germinate and I can have a real spicy pepper assortment.
5.3.10
tomato plants are budding!
I finally have some flower buds on my tomato plants. Since the plants are all about three months old, I was really starting to worry that I was going to have to induce blooming myself.
I´m not surprised to see the Oregon Spring Bush and Santiam tomato plants budding since they are supposedly the fastest to mature at around 55-65 days. I am surprised though, at the Fox cherry buds, since they supposed take 90 days to mature. Regardless, I´m very pleased that the tomato plants are healthy and happy enough to be budding. I wonder how long between first buds until ripe fruit?
4.3.10
herb update
About a month ago, I ordered some more herb seeds, this time from Renee's Garden. The Greek oregano, French thyme, and French rosemary I planted have now all germinated, and the little seedlings are doing wonderfully.
Click on the slideshow to view it larger in Picasa:
The sweet basil replant and the fino verde basil are also looking very healthy.
Sweet basil:
The main difference (so far) between the sweet and fino verde basil is in the shape and curvature of the leaves. The sweet basil leaves are much more rounded and arc upward, while the fino verde basil leaves are pointed and lie flat.
Here're both side-by-side for easy comparison:
In terms of flavor, the fino verde basil is supposedly stronger and spicier than sweet basil, and Seeds of Change says that the leaves retain their flavor even after flowering.
The shelf cilantro is doing well. I've moved it to a west-facing windowsill, and while it's hard to beat the growth rate in a greenhouse, all of the seedlings now have primary leaves.
We're starting to get into sunnier and warmer weather here, which is creating nicer growing conditions for the plants by the window and adding intense broad spectrum supplementary light to the greenhouses. It would be nice to live somewhere that had sunnier winters so that the fluorescent lights would be supplemental to the daylight instead of the other way around.
Click on the slideshow to view it larger in Picasa:
The sweet basil replant and the fino verde basil are also looking very healthy.
Sweet basil:
Fino verde basil:
The main difference (so far) between the sweet and fino verde basil is in the shape and curvature of the leaves. The sweet basil leaves are much more rounded and arc upward, while the fino verde basil leaves are pointed and lie flat.
Here're both side-by-side for easy comparison:
In terms of flavor, the fino verde basil is supposedly stronger and spicier than sweet basil, and Seeds of Change says that the leaves retain their flavor even after flowering.
The shelf cilantro is doing well. I've moved it to a west-facing windowsill, and while it's hard to beat the growth rate in a greenhouse, all of the seedlings now have primary leaves.
We're starting to get into sunnier and warmer weather here, which is creating nicer growing conditions for the plants by the window and adding intense broad spectrum supplementary light to the greenhouses. It would be nice to live somewhere that had sunnier winters so that the fluorescent lights would be supplemental to the daylight instead of the other way around.
1.3.10
Pimientos de padrón transplanted
I finally transplanted my six pimiento de padrón plants.
I´m very pleased with their progress. All of the plants have nice shiny leaves and lots of new leaf sprouts. A couple of the plants have some yellowing leaves that could possibly be indicative of photobleaching. Since I know that these pepper plants require an intense light source, I´m thinking that the yellowing is more likely a sign that they needed to have been re-transplanted before now. Hopefully in their new containers with fresh soil, they will quickly recover.
26.2.10
Habanero pepper seeds successfully harvested/germinated
My habanero pepper seeds have finally germinated!
I came by these seeds in a slightly unusual fashion. As a spicy food enthusiast, I love habanero peppers, and try to always have at least two or three on hand for spicing up nachos, pierogies, mashed potatoes, etc. A bag of these peppers got tucked away in the back of the refrigerator, and instead of getting moldy, they dried out in a really pretty way. Their orange color had darkened and they looked almost crystallized.
Habanero peppers are one of the hottest in the world, and I was pleased that the refrigerator-dried peppers had retained their spiciness. As I chopped them up for cooking, I noticed that the seeds were completely dry and seemingly intact. I don´t know much about harvesting seeds, but I know you have to dry them out first, and so these seemed like potential candidates for growing my own habanero pepper plants.
I looked up the planting and germinating instructions for habanero peppers at Renee´s Garden, and planted all the seeds I could harvest from the last dried-out pepper. I´ve loaned out my seedling heat mat, and so I was concerned that the seeds might not germinate without that extra heat. As the days and then weeks passed, I began to water the seeds with increasingly warmer tap water to try to really heat up the soil and encourage germination. Finally, after almost a month, I have two habanero pepper seedlings and indications of at least one other germinating seed.
Like most peppers, it seems that habaneros really like hot weather. Renee´s Garden recommends "sowing the seeds indoors in February or March, and then transplanting them outside when nighttime temperatures are consistently 50-55 F." As with the pimientos de padrón, though, I can´t imagine that in this climate I´ll be planting these peppers in the garden before late June, if at all. It seems at least possible to container garden habanero pepper plants and have them flower and fruit as a perennial. This seems especially ideal since supposedly the hotter the growing temperatures, the spicier the peppers become, and it would be much easier to consistently supply the plants with hot and bright growing conditions indoors. Year-round, home grown habanero peppers sounds fantastic.
I came by these seeds in a slightly unusual fashion. As a spicy food enthusiast, I love habanero peppers, and try to always have at least two or three on hand for spicing up nachos, pierogies, mashed potatoes, etc. A bag of these peppers got tucked away in the back of the refrigerator, and instead of getting moldy, they dried out in a really pretty way. Their orange color had darkened and they looked almost crystallized.
Habanero peppers are one of the hottest in the world, and I was pleased that the refrigerator-dried peppers had retained their spiciness. As I chopped them up for cooking, I noticed that the seeds were completely dry and seemingly intact. I don´t know much about harvesting seeds, but I know you have to dry them out first, and so these seemed like potential candidates for growing my own habanero pepper plants.
I looked up the planting and germinating instructions for habanero peppers at Renee´s Garden, and planted all the seeds I could harvest from the last dried-out pepper. I´ve loaned out my seedling heat mat, and so I was concerned that the seeds might not germinate without that extra heat. As the days and then weeks passed, I began to water the seeds with increasingly warmer tap water to try to really heat up the soil and encourage germination. Finally, after almost a month, I have two habanero pepper seedlings and indications of at least one other germinating seed.
Like most peppers, it seems that habaneros really like hot weather. Renee´s Garden recommends "sowing the seeds indoors in February or March, and then transplanting them outside when nighttime temperatures are consistently 50-55 F." As with the pimientos de padrón, though, I can´t imagine that in this climate I´ll be planting these peppers in the garden before late June, if at all. It seems at least possible to container garden habanero pepper plants and have them flower and fruit as a perennial. This seems especially ideal since supposedly the hotter the growing temperatures, the spicier the peppers become, and it would be much easier to consistently supply the plants with hot and bright growing conditions indoors. Year-round, home grown habanero peppers sounds fantastic.
6.2.10
first transplant slideshow
Here's a slideshow of all the plants after their first transplant.
I really can't believe how quickly the tomato plants are recovering. The Maglia Rosa cherry tomato plants all had roots growing ~5" past their plastic slots, so I guess I waited too long. Thankfully, all the tomato plants seem to be doing fantastically now.
Today, I had to raise the 2' 2-bulb fixture on the germinating shelf since the second batch of Maglia Rosa cherry tomato and Dukat dill have both gotten so tall.
Germinating shelf, Dukat dill and Maglia Rosa cherry tomato:
Dukat dill, second batch:
Maglia Rosa cherry tomatoes, second batch:
I can't believe how many tomato plants (and hopefully, therefore, tomatoes) I'm going to have.
I installed another velcro flap this morning. So there are now two providing access to the front of the germinating shelf, and one each on the front and back of the growing shelf. It's nice to be able to get in and out of the greenhouse so easily, but the greenhouse temperature seems to be decreasing as the number of flaps increases, which suggests that there's air is leaking out through the velcro seals. As it gets warmer out, this won't be as much of an issue. For now, I'm covering the velcro with packing tape to make a tighter seal.
I really can't believe how quickly the tomato plants are recovering. The Maglia Rosa cherry tomato plants all had roots growing ~5" past their plastic slots, so I guess I waited too long. Thankfully, all the tomato plants seem to be doing fantastically now.
Today, I had to raise the 2' 2-bulb fixture on the germinating shelf since the second batch of Maglia Rosa cherry tomato and Dukat dill have both gotten so tall.
Germinating shelf, Dukat dill and Maglia Rosa cherry tomato:
Dukat dill, second batch:
Maglia Rosa cherry tomatoes, second batch:
I can't believe how many tomato plants (and hopefully, therefore, tomatoes) I'm going to have.
I installed another velcro flap this morning. So there are now two providing access to the front of the germinating shelf, and one each on the front and back of the growing shelf. It's nice to be able to get in and out of the greenhouse so easily, but the greenhouse temperature seems to be decreasing as the number of flaps increases, which suggests that there's air is leaking out through the velcro seals. As it gets warmer out, this won't be as much of an issue. For now, I'm covering the velcro with packing tape to make a tighter seal.
5.1.10
greenhouse insulation and sage and marjoram slideshows
We've had several nights in a row now with temperatures down almost near 0F. Since the only source of heat for the sunporch comes from the room attached to it, the temperature outside the greenhouse is dropping below 40F at night. This means that there's a temperature differential of around 30 degrees between tray 1 on the top shelf and the air just beyond the thin plastic sheet. Not that I don't trust the little electric heater that's keeping the seedlings from freezing, but I've decided to give it some help. I'm now wrapping the greenhouse structure in two layers of flannel sheets. This has two benefits. One, it should help to better insulate the greenhouse, saving me some money on my electric bill. And two, the white inner lining of the sheets should serve as a better reflector than the translucent plastic sheet, meaning more of the light stays bouncing around inside the greenhouse. During the day, I raise the sheets on the side facing the window in case it actually stops snowing at some point and we get some direct sun.
Front view:
The bright patch in the middle of the front is not some fancy design or lighting scheme, but rather a hole ripped in the inner sheet. It does demonstrate, however, how much light the sheets are actually blocking and reflecting back into the greenhouse.
Side view:
It doesn't look like much, but I think it's helping.
As I mentioned in a previous post, the garden sage and syriaca zaatar marjoram have both sprouted and seem to be doing well. Here are slideshows of their progress so far.
Syriaca Zaatar Marjoram (click for bigger slideshow in Picasa):
And the Garden Sage:
Their primary leaves already look like sage! These little seedlings just amaze me.
Front view:
The bright patch in the middle of the front is not some fancy design or lighting scheme, but rather a hole ripped in the inner sheet. It does demonstrate, however, how much light the sheets are actually blocking and reflecting back into the greenhouse.
Side view:
It doesn't look like much, but I think it's helping.
As I mentioned in a previous post, the garden sage and syriaca zaatar marjoram have both sprouted and seem to be doing well. Here are slideshows of their progress so far.
Syriaca Zaatar Marjoram (click for bigger slideshow in Picasa):
And the Garden Sage:
Their primary leaves already look like sage! These little seedlings just amaze me.
2.1.10
germination and primary leaves slideshow
I've been reading up on germination to learn the correct terminology for all the stages of development I've been seeing in the greenhouse. A seed consists of four main parts: the seedcoat, the endosperm, the cotyledon(s), and the embryo. When a seed is exposed to heat and moisture, it begins to germinate. The first bit of green to break the surface is usually the hypocotyl, and the pronounced bend that is typically seen is called the hypocotyl arch. With sufficient light, the hypocotyl will straighten itself, and the cotyledon(s) emerge. All the plants that I'm growing are dicots, meaning that they have two cotyledons. They look like leaves, but their job is to supply food to the developing plant until the primary leaves can take over. Eventually they turn yellow and fall off when they are no longer needed by the plant.
Cilantro germination:

First primary leaves slideshow (click to view larger and prettier in Picasa):
In younger seed news, the Garden Sage and Syriaca Zaatar Marjoram have sprouted in tray 2, and the Dukat Dill is just now starting to emerge, along with a single tarragon sprout. I'm starting to wonder about these tarragon seeds. Maybe it wasn't lack of heat in tray 1 that caused only three seeds to germinate.
Cilantro germination:

First primary leaves slideshow (click to view larger and prettier in Picasa):
In younger seed news, the Garden Sage and Syriaca Zaatar Marjoram have sprouted in tray 2, and the Dukat Dill is just now starting to emerge, along with a single tarragon sprout. I'm starting to wonder about these tarragon seeds. Maybe it wasn't lack of heat in tray 1 that caused only three seeds to germinate.
13.12.09
Santiam tomato slideshow
It's been brought to my attention that the tomato slideshow in the 11/12 post is no longer functional. This is related to the rather steep Picasa web album learning curve. As that particular slideshow cannot easily be restored, I've uploaded the Santiam tomato slideshow that I've been working on.
Click to view a larger version in Picasa:
Subscribe to:
Posts (Atom)
